The first job is to build the DCC++ Controller. What follows is my "how to" guide that i've already shared with a couple of friends.
My Shopping List
Arduino Uno
|
http://www.ebay.co.uk/itm/Arduino-UNO-Rev3-R3-Development-Compatible-Board-ATMEGA328P-CH340-with-USB-Cable-/381810859511?hash=item58e5b35df7:g:hf0AAOSwPCVX~dLS
|
£5.29
|
Motor Controller
(IBT-2)
|
http://www.ebay.co.uk/itm/G419-Semiconductor-Motor-Driver-Auto-BTS7960-43A-H-Bridge-PWM-Drive-For-Arduino-/232212824917?hash=item3610f68355:g:pvAAAOSw9GhYgx-V
|
£10.48
|
2N2222 Transistor
|
http://www.ebay.co.uk/itm/20pcs-Transistors-10-x-2N2222-NPN-10-x-2N2907-PNP-TO-92-Package-/141788032386?hash=item210339ad82:g:ZCQAAOSw0HVWCrfX
|
£1.19
|
A power supply
|
Any 12-18v power supply should do the trick. Mine’s 18v 10A.
You will need AT LEAST one amp, better to have more.
|
£15.00 ish
|
Some 1K resistors
|
http://www.ebay.co.uk/itm/Carbon-Film-Resistors-1-4W-0-25W-Full-Range-of-Values-Various-Pack-Sizes-/152059712084?var=&hash=item2367771254:m:mmv0u0bUeNDzAHY6xUyeLew
|
£0.99
|
Prototype board
|
http://www.ebay.co.uk/itm/5Pcs-Double-Side-PCB-Prototype-Circuit-Printed-Soldring-Track-Strip-Board-5x7cm-/262317473034?hash=item3d1356fd0a:g:PuQAAOSwZ8ZW2HlL
|
2.99
|
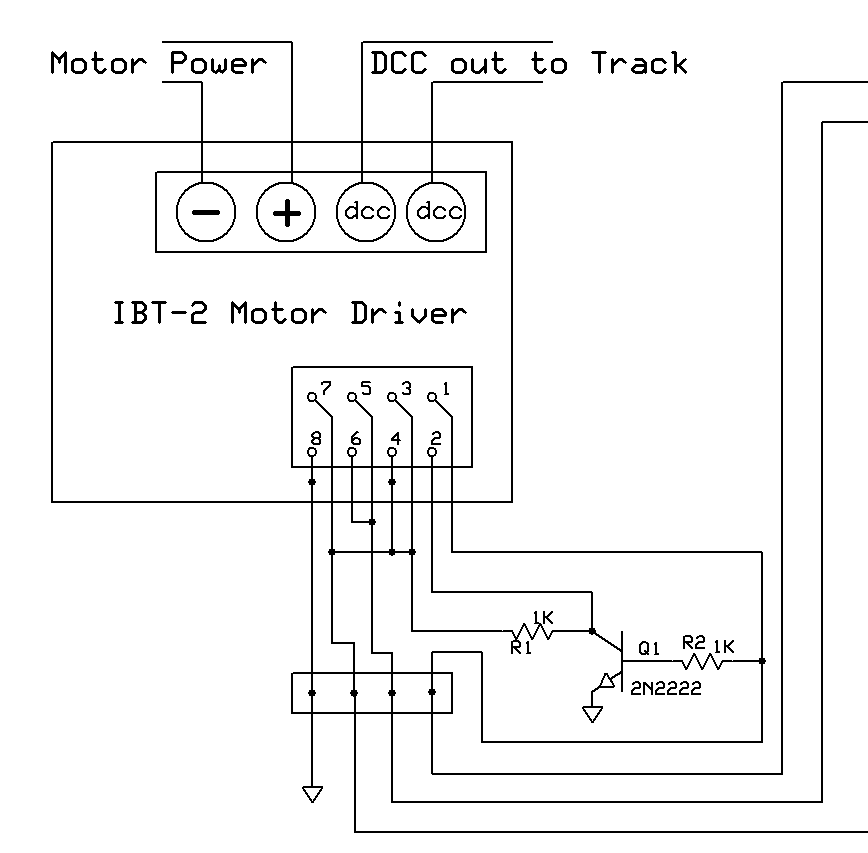
Create a small circuit board
As per this diagram.
Note that the unlabelled wires are:
- Top Right - this goes to the Arduino Pin 10
- Next one down - this goes to Arduino Pin A0
- Bottom Right - this one goes to Arduino Pin 3
I also wired a couple of LEDs in to help with diagnostics, and show when track power is on, and when signal active.
- First LED goes inline with IBT-2 pin 1 - this shows when signal is received
- Second LED goes inline with IBT-2 pins 7/3/4 to show when track power is on
Then you need to install the firmware on the Arduino
- Install the Arduino IDE from https://www.arduino.cc/en/main/software
- Download DCC++ software from https://github.com/DccPlusPlus/BaseStation
- Install the DCC software into the Arduino folder and open with the IDE
- Configure the IDE for the Arduino UNO board, and point it toward the correct COM port
- Push the code to the UNO
Test the controller
At this point, whenever you power up the arduino, it should talk back on the serial port (or virtual serial port through USB) with a message to say DCC++ is running. If you get that, software is installed correctly.
The arduino IDE has a built in “serial monitor” that lets you send/receive from the serial port, which is good for testing if it’s working correcly.
Before using any further software, it might be a good idea to use this serial monitor to send a few test commands. All the commands are documented here:
Try sending these commands for a quick test:
- <1> This turns on track power
- <t 1 3 126 1> This commands train number 1, using DCC address 3, speed 126, forwards
Note the concept of the train number and the DCC Address:
- Train number is used internally on the DCC++ controller. Once you have allocated a train number, it will continually re-transmit the speed message to that train. If the train goes over some points and momentarily loses power, this means that it will send the command to the train again, automatically, and the train will restart. If you have multiple trains you must give them all separate train numbers or you will get into a mess
- DCC Address is the address of the DCC chip itself. This usually defaults to 3 on most trains, and you can send amendments to the configuration (Known as CV Codes) to alter it. An example bit of code to alter a DCC address from 3 (default) to 4 would be:
<w 3 1 4>
w … means write to a CV address
3 … is the current DCC address of the chip you are writing to
1 … is the CV code. 1 is the CV address. Lists of other CV codes found in the manual for your chip
4 … is the new value for this configuration parameter, in this case, DCC address 4.
Now install controlling software
Install JMRI or the DCC++ Controller
For JMRI point it at the COM port, configured for DCC++ controller type.
Once this is working, you can install WiThrottle on the iPhone too, and it will talk to the PC.
Once this is working, you can install WiThrottle on the iPhone too, and it will talk to the PC.
I only ever did this once, so don’t have a lot of experience here! My setup uses my own software which sends the serial codes direct.
Why not give credit to David Bodnar; as well as publish the complete schematic?
ReplyDelete